VMWare
HostBill (Deactivated)Last updated May 14, 2018 by HostBill
Overview
VMware vSphere is the industry-leading virtualization platform for building cloud infrastructures. vSphere enables you to run your business-critical applications confidently to meet your most demanding service level agreements at the lowest TCO. Our VMware module for HostBill utilizes the VMware API to create, configure and control Virtual Machines and gives your clients control over their resources with nice looking yet rich-featured client area.
Activating the module
- If the module is included in your HostBill edition you can download it from your client portal.
- If the module is not included in your HostBill edition you can purchase it from our marketplace and then download it from the client area.
- Once you download the module extract it in the main HostBill directory.
- Go to Settings → Modules → Hosting Modules, find and activate VMware module.
Connecting HostBill with Vmware
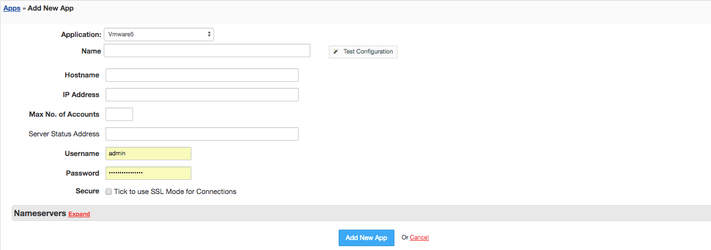
- Proceed to Settings → Apps → Add new App
- From Applications list select VMware
- Enter:
- Name – Name of this connection
- Hostname
- IP Address
- Max no of Accounts
- Server Status Address
- Username
- Password
4. Verify entered credentials by clicking Test Connection to check if HostBill can connect
5. Save Changes

Installing VMware Tools
Detailed instruction how to install VMware tools for your OS are available on: www.vmware.com/support/ws5/doc/new_guest_tools_ws.html
Adding VMware product
- In HostBill go to Settings → Products & Services, and Add new order page
- From Order Types select Vmware5
- After creating order page add new product, provide its name and save changes
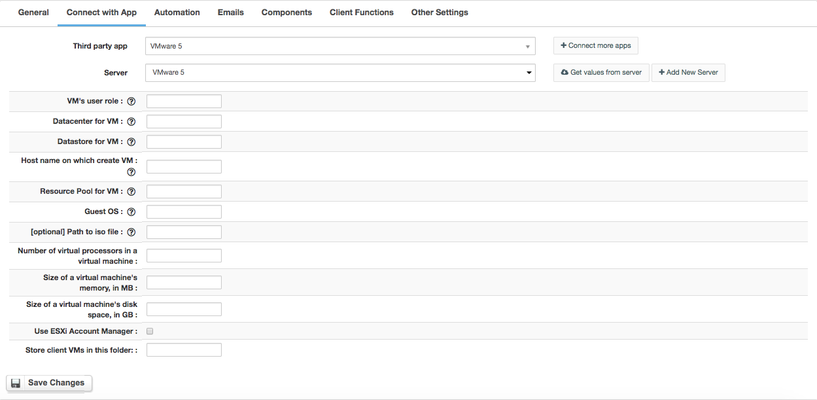
- In product configuration section proceed to Connect with App, select VMware5 module and App server created in previous steps.
- Click Get values from server and select desired configuration options:
- VM’s user role
- Datacenter for VM
- Datastore for VM
- Hostname on which create VM
- Resource pool for VM
- Guest OS
- (optional) Path to ISO file
- Number of virtual processors in a VM
- Size of VM’s memory
- Size of Vm’s disc spae
- User ESXI account manager
- Store client VMs in this folder
Save changes, your package is ready

For more generic product configuration details including price, automation, emails settings refer to Product Configuration article.
Configuring Client Functions
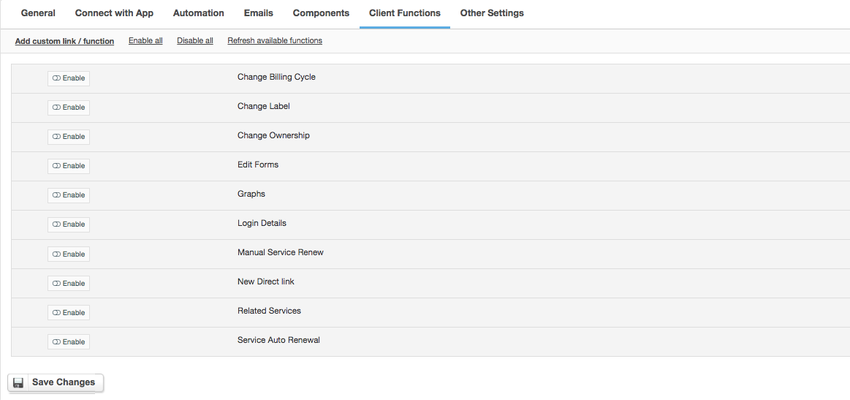
In Products & Services → Your Order Page → Your Product → Client Functions you can control what features customer will have access to in client portal, by clicking Enable/Disable next to the given option.
Use Edit button to adjust function appearance in the client portal.
For VMware you can enable a number of standard client functions:
- Change Billing Cycle
- Change Label
- Change Ownership
- Edit Forms
- Graphs
- Login Details
- Manual Service Renew
- New Direct Link
- Related Services
- Service Auto Renewal

Frequenty Asked Questions
Question: What VMware versions are supported?
Answer: Any 5.x should work, there was no significant API changes across ESXI version updates.
Question: Module works, but connection is slow, what can I do?
Answer: When possible, use empty node to create new VMs from HostBill, nodes filled by virtual machines issues slow API responses.
Question: Test connection do not return any success/fail status?
Answer: Please increase your memory limit to at least 512MB. Make sure that php-soap extension is installed.
Question: What is the purpose of the username/password that is created with an order?
Answer: If you’re using ESXi account manager (node is not managed by vCenter), HostBill creates user in ESXi directly, allowing for further resource management (ie trough API).
Importing current Vmware VMs into HostBill
HostBillLast updated Apr 19, 2018 by HostBill
If you have number of VMs on your vSphere/ESxi already and you wish to let your customers manage them under HostBill.
To do so:
- Setup your VMware app connection, VMware product (as described in parent article)
- Make sure you have client account you wish to assign VM to in HostBill already (or register through Clients→Register new client)
- Add new order for this client through Orders → Create order:
- Select customer you wish to assign VM to
- Select product to assign VM under (defined in step 1)
- Generate order from draft
- At this stage you will have account added in pending state in HostBill.
- Find out VM UUID in vSphere you wish to import. https://blogs.vmware.com/vsphere/2012/02/uniquely-identifying-virtual-machines-in-vsphere-and-vcloud-part-2-technical.html
- Fill in UUID in Accounts section in HostBill, for a pending account just created:
- Enter UUID from vSphere
- Set account state to “Active”
- Save Changes